 |
{{display type="notebook"}}
{{display type="notebook" showMenu="false" showTitle="false"}}
//This is the default notebook
{{display type="notebook" showMenu="false" showTitle="false"}}

{{display type="notebook" notebookId="notebook2" showMenu="false" showTitle="false"}}

{{display type="notebook" notebookId="notebook3" showMenu="false" showTitle="false"}}
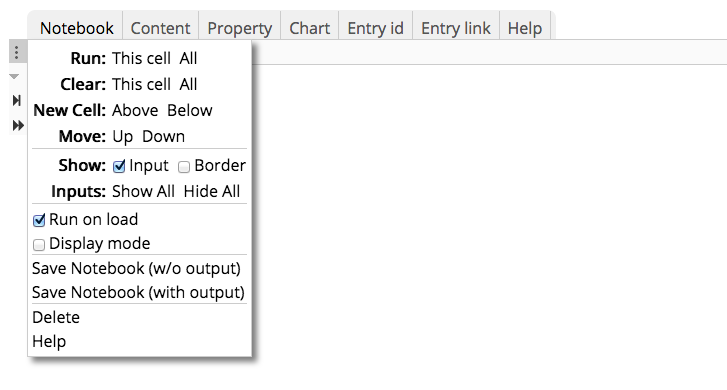
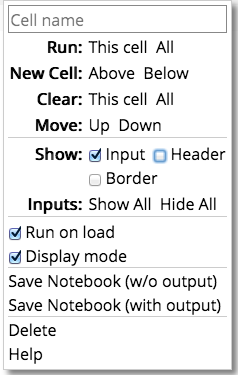
A notebook is made up of a number of notebook cells. Initially there is just one cell. Each cell has an input area, output area and cell menu. The menu can either be accessed through the Notebook menu or from the left side link that is shown on mouseover:
The input of a notebook cell can be any combination of html, wiki text, markdown, raw text, javascript, python, or special "shell" commands and "fetch" commands. The input can either be all one type or a mix of different input types. Each type is delineated by a "%%".
%% html
Regular html text

%% css
CSS

%% wiki
RAMADDA wiki text

%% md
Markdown text

%% fetch
Fetch commands

%% js
Javascript

%% py
Javascript

%% sh
Shell commands

%% fetch
Fetch commands

%% raw
Raw text
A command can be on the same line
%% html some html
%% wiki some wiki
%% js some javascript
%% html
html text
%% wiki
RAMADDA wiki text
The wiki text is just regular RAMADDA wiki text. More information here.
%% md
# markdown 1
# markdown 2
%% fetch
js: /url/to/javascript
css: /url/to/css
html: /url/to/html
You can also load the contents of a RAMADDA entry file by providing the entry id or path names as defined for the shell commands below
%%fetch
text: somevar=3cc5aa82-7fac-467d-b285-5212625296d6
text: somevar=../../files/file.txt
text: somevar=files/file.txt
...
%% sh
shell commands
The shell commands allow for easy navigation around the RAMADDA entry hierarchy. The following shell commands are supported. All of the "cd" commands change the cell's current entry.
%% sh
#change current entry to the base entry
cd

#change current entry to the root
cd  /

#change current entry to the parent of the current entry
cd  ..


#change current entry to the parent of the parent of the current entry
cd  ../..

#change current entry to the "Test" entry under the root
cd  /Test

#change current entry to the first entry found under the root with name that begins with "foo"
cd  /foo*

#change current entry to the first entry found under the root with name that ends with "bar"
cd  /*bar

#change current entry to the "Test" entry relative to the current entry
cd  ../Test

#change current entry to the child of the current entry with name "Child"
cd  Child

#change current entry to the grandchild entry with name "Grandchild"
cd  Child/Grandchild

#print the current entry
pwd

#show the children tree of the current entry
ls

#print output
echo any output


#shell commands can be on one line, e.g.:
cd /;pwd;ls;cd;pwd
%% js
javascript code
Javacsript input comes in 3 forms - single line expression, single line with a return or multiple lines with a return. For example, the below will display the number "3":
%% js
1+2
Here is a single line with a return:
%% js
return "some string"
Here is a multiple line input:
%% js
var x;
x = 1+2;
return x;
The javascript input can have function definitions:
%% js
function result() {
   return "the result";
}
return result();
There are a number of helper functions and pre-defined variables that can be accessed from javascript.
The above described entry context can be accessed with the variables:
%% js
base
current
parent
root
The state object holds the state of this JS cell execution and provides a number of methods.
%% js
//TODO
%% js
state.getCell() // return the cell
state.getNotebook() // return the cell
state.clear() //clear the output
state.ls() //List the current entry
state.stop() //Stop cell execution

//make wiki text. This is applicable to the current entry if the
//optionalEntry is not provided. If optionalCallback is not provided then
//the wiki text is displayed on the page. Else the wiki text is passed to
//the callback
state.wiki(wikiText,optionalEntry,optionalCallback);

state.write(html); //write the html to the page
Putting the entry state and the functions together we can do:
state.write(base.getName());
state.write(root.getName());
state.write(current.getName());
state.write(parent.getName());

//Create wiki text for the given entry
state.wiki("{{tree}}", current);
state.wiki(":title {{name}}", root);
%% py
print "hello world"
%% plugin
{
  "languageId": "jsx",
  "displayName": "React JSX",
  "url": "https://raw.githubusercontent.com/hamilton/iodide-jsx/master/docs/evaluate-jsx.js",
  "module": "jsx",
  "evaluator": "evaluateJSX",
  "pluginType": "language"
}
Assume we have cell content as some html, and the name of the cell is "the_value", e.g.:
%%html
Some html
In another cell you can insert the HTML with the macro:
%%html
Some other cell
Here is the macro: ${the_value}
If you have a JS cell then the "the_value" will be set as a variable that can be referenced, e.g.:
%%js
var x = the_value;
The macro values can also be set within a cell using the "raw" chunk type by adding a var=<var name> line like:
%%raw var=id
Some macro value